

Melon pan is a popular Japanese sweet bread. Traditional melon pans have cantaloupe-like appearances, but my version is decorated with cute Hello Kitty cookies. Try this fun baking project today!
What is a melon pan?
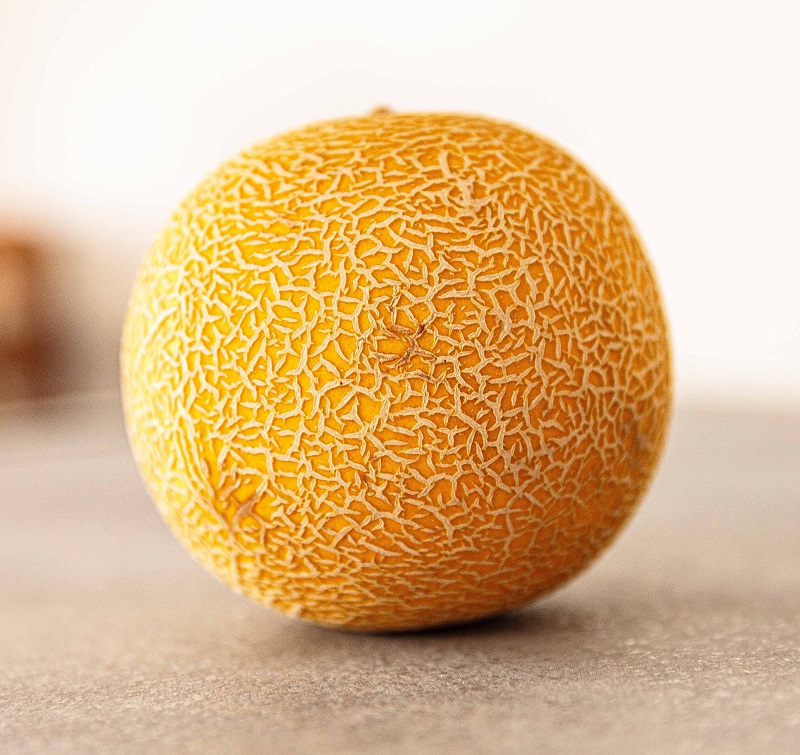
Melon pan is a Japanese sweet bread that has thin cookie crusts on the outside and a soft and fluffy bun inside. It is called “melon pan” because it resembles the appearance of melon or cantaloupe that is popular in Japan. “Pan” simply means “bread” in Japanese.

What does melon pan taste like?
Even though it is called a “melon pan,” a traditional melon pan does not contain any melon flavor. If anyone has tried the Mexican sweet bread, conchas, melon pan tastes very similar to them. They are gently sweet without any fillings.
What is special about this melon pan?
With my version, I turned the traditional melon pan into something more fun! I arranged the recipe and technique developed by a Japanese food artist, Eriko Hanada (@elly.hana), and shaped the cookies to Hello Kitty.
I used this Hello Kitty cookie cutter and these cookie cutters for stars and hearts.
Ingredients
For the cookie
- unsalted butter
- granulated sugar
- milk
- all-purpose flour
- pink food coloring
- golden yellow food coloring
For the bread
- bread flour
- soft unsalted butter
- granulated sugar
- Kosher salt
- milk
- active dry yeast
- warm water
For the decoration
- granulated sugar for sprinkling
- chocolate chips to draw Hello Kitty’s eyes
Instructions
For the cookie
- In a large bowl, mix softened butter, granulated sugar, all-purpose flour, and milk with a spatula. You may not need all milk if making this in warm environment.
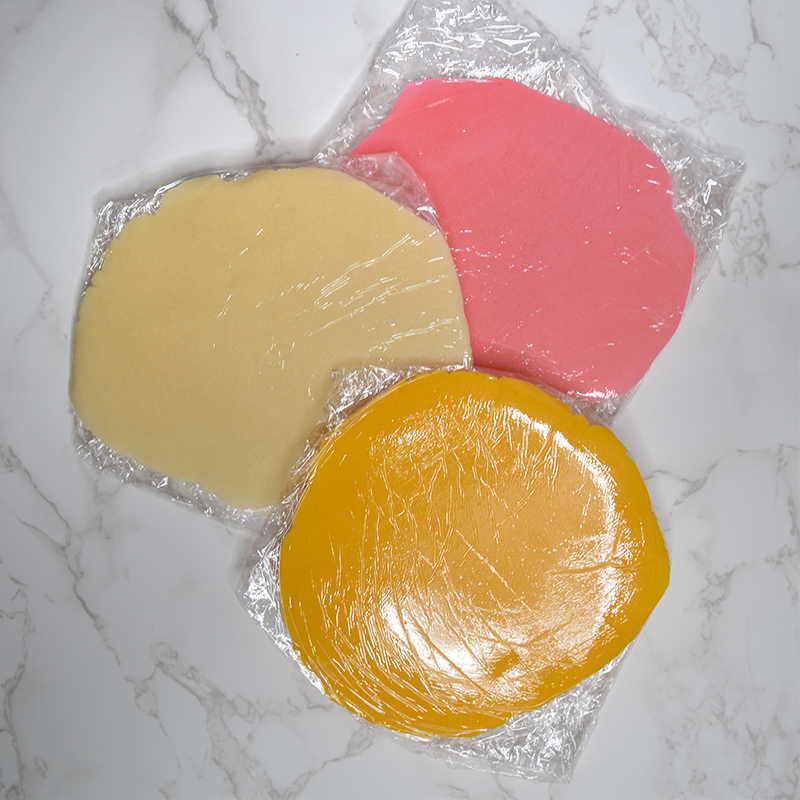
- Once the dough becomes a ball, divide it into three. Leave one of the portions as-is for white dough. Add a dash of golden yellow food coloring to one of the dough balls and mix until well combined. Add a dash of pink food coloring to the other dough ball and mix until well combined.
- Using a rolling pin, roll out each dough ball to about ⅛ inch thickness in between two sheets of plastic wrap. Chill the dough sheets in a refrigerator for at least 10-15 minutes.
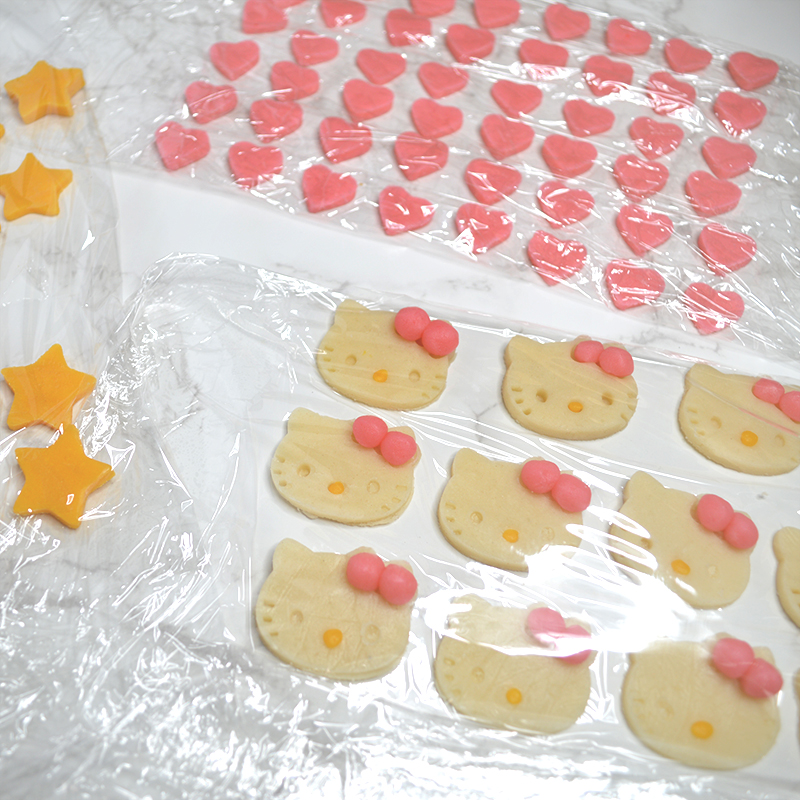
4. Using cookie cutters, cut out the dough into shapes. I cut out the plain dough with a Hello Kitty cookie cutter, then cut the yellow dough into star shapes and the pink dough into heart shapes. Don’t forget to attach noses with tiny amounts of yellow cookie dough and bows with the pink cookie dough on Hello Kitty faces.
5. Once all the cookie doughs are shaped, place them in between two sheets of plastic wrap and rest them for at least an hour. You can even make these cookies a day ahead and chill them overnight.
For the bread
- In a small bowl, add warm water and active dry yeast and mix. Set it aside for the yeast to bloom for 10 minutes or until creamy foam shows up on the surface. (This step is not necessary if using instant yeast. It can be added directly to the dry ingredients.)
- In a large bowl, mix bread flour, granulated sugar, and salt.
- Add the yeast mixture, softened butter, and milk to the dry ingredients and mix.
- Transfer the dough to the lightly floured work surface. Next, using your hand, knead by pushing the dough down and forward then folding the dough over itself. Repeat until it becomes smooth and elastic for about 10 minutes.
- Place the dough in a large bowl and cover with plastic wrap, and leave it at a warm place (about 90ºF/32ºC) for 1 hour.
- Make a fist with your hand and push the dough gently and firmly into the center and deflate it.
- Turn the dough onto a work surface. Divide the dough into 3 (about 96g each). Roll each dough into small buns. Place each of them onto a baking sheet with parchment paper. Cover with plastic wrap loosely, let them rise for 30-40 minutes in a warm place.
For the assembly
- Preheat the oven to 320ºF/160ºC.
- Brush on some water on top of the buns.
- Take out the cookies from the refrigerator and start pasting the cookies on the buns.
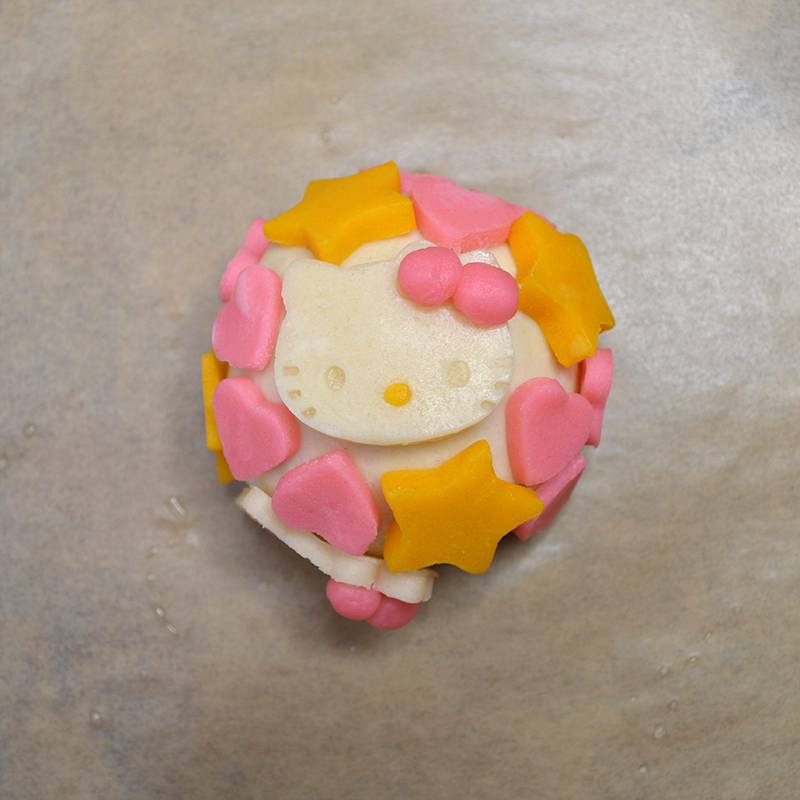
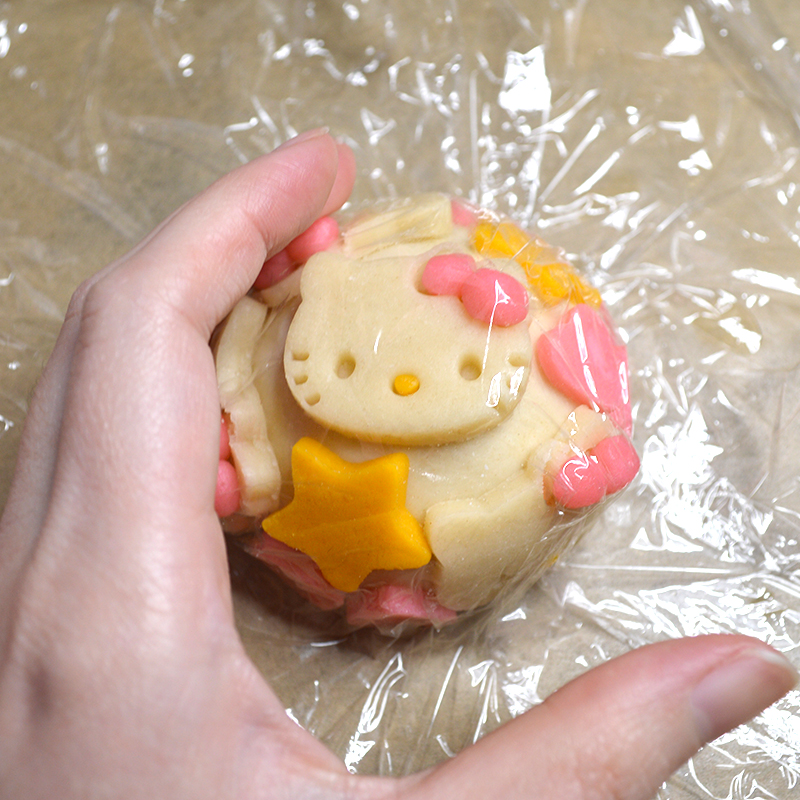
4. Once all the cookies are pasted, put plastic wrap over the buns and gently press them with your hands to make sure all the cookies are stuck well. Then remove the plastic wrap.
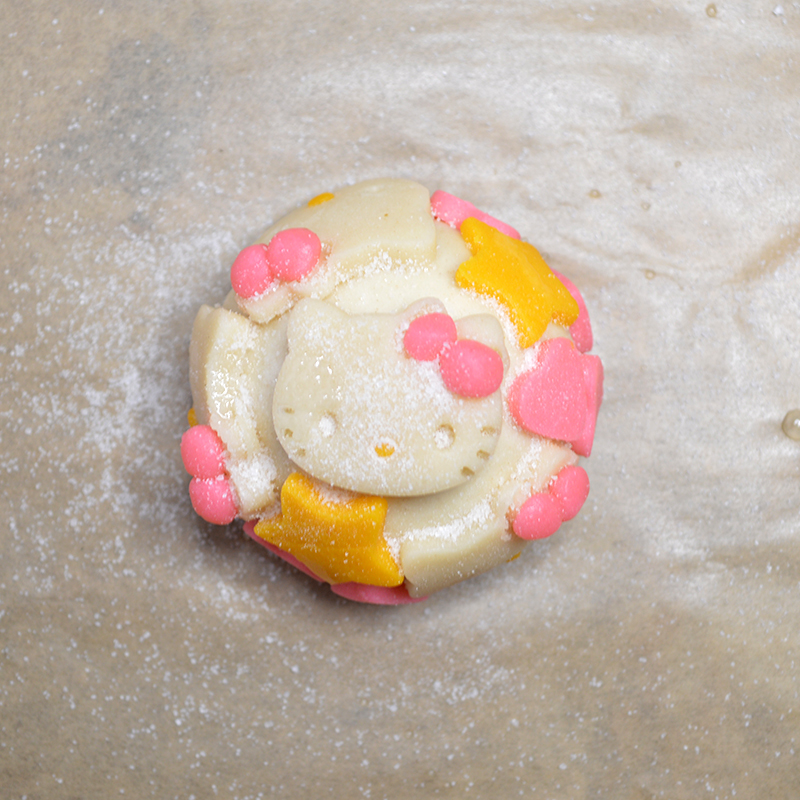
5. Sprinkle the buns with some granulated sugar. If granulated sugar is not sticking, brush the buns with some water.
6. Bake for about 20-25 mins or until the surface gets dry and has a subtle brown color. Once baked, let the buns cool completely.
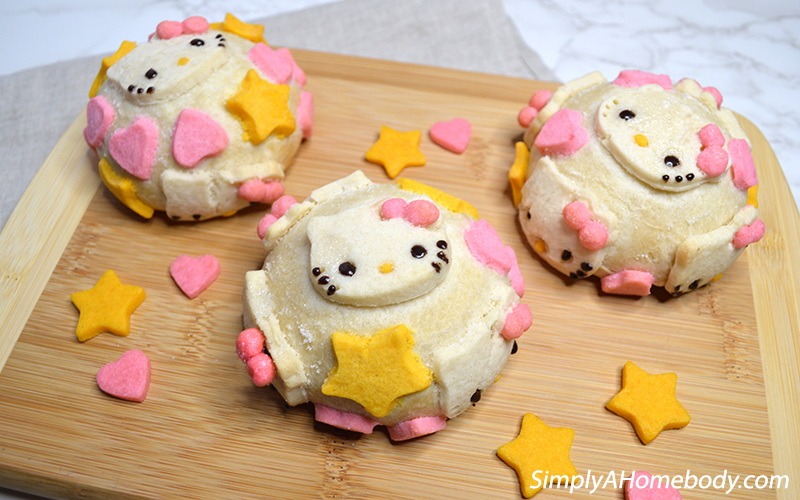
7. When the melon pans are cooled, melt chocolate chips in a microwave. Zap them for 30 seconds and stir. Repeat this process until the chocolate is melted and smooth.
8. Place the melted chocolate in a piping bag. Snip off the tips to have an about ¼-inch diameter hole.
9. Fill Hello Kitty’s eyes and whiskers with the melted chocolate and enjoy! Tip: If the chocolate hardens back before you could finish decorating, boil some hot water and place it in a heat-resistant cup. Once the cup gets hot, press the piping bag against it and melt the chocolate until it becomes workable again.
For the leftover cookies
- Preheat oven to 320ºF/160ºC.
- Bake them for 5-10 minutes or until the surface looks dry. *The baking time varies depending on the size of the cookies.
If you like this Hello Kitty Melon Pan, you may also like:
- Hello Kitty Cookies – Simple Recipes
- Hello Kitty Cake Roll – A step by step recipe with a template
- How To Make Rilakkuma Pull-Apart Bread

Melon Pan – Hello Kitty Version
Equipment
- Large bowl
- Spatula
- Rolling Pin
- Plastic wrap
- Cookie cutters
- Small bowl
- Baking sheet
- Parchment paper
- Piping bag
Ingredients
For the cookie dough
- 3½ tablespoons unsalted butter 50g
- 2 tablespoons granulated sugar 30g
- 2 teaspoons milk 10ml
- ½ cups all-purpose flour 80g
- pink food coloring
- golden yellow food coloring
For the bread
- 1 cup bread flour 160g
- 3 tablespoons unsalted butter 40g, soft but not melted
- 1 tablespoon granulated sugar 12g
- 3 tablespoons milk 45ml
- ½ teaspoons kosher salt 3g
- ½ teaspoons active dry yeast 2g
- ¼ cups warm water 55ml
For the decoration
- some granulated sugar for sprinkling
- ½ cups chocolate chips to draw Hello Kitty’s eyes
Instructions
For the cookie
- In a large bowl, mix softened butter, granulated sugar, all-purpose flour, and milk with a spatula. You may not need all milk if making this in warm environment.
- Once the dough becomes a ball, divide it into three. Leave one of the portions as-is for white dough. Add a dash of golden yellow food coloring to one of the dough balls and mix until well combined. Add a dash of pink food coloring to the other dough ball and mix until well combined.
- Using a rolling pin, roll out each dough ball to about ⅛ inch thickness in between two sheets of plastic wrap. Chill the dough sheets in a refrigerator for at least 10-15 minutes.
- Using cookie cutters, cut out the dough into shapes. I cut out the plain dough with a Hello Kitty cookie cutter, then cut the yellow dough into star shapes and the pink dough into heart shapes. Don’t forget to attach noses with tiny amounts of yellow cookie dough and bows with the pink cookie dough on Hello Kitty faces.
- Once all the cookie doughs are shaped, place them in between two sheets of plastic wrap and rest them for at least an hour. You can even make these cookies a day ahead and chill them overnight.
For the bread
- In a small bowl, add warm water and active dry yeast and mix. Set it aside for the yeast to bloom for 10 minutes or until creamy foam shows up on the surface. (This step is not necessary if using instant yeast. It can be added directly to the dry ingredients.)
- In a large bowl, mix bread flour, granulated sugar, and salt.
- Add the yeast mixture, softened butter, and milk to the dry ingredients and mix.
- Transfer the dough to the lightly floured work surface. Next, using your hand, knead by pushing the dough down and forward then folding the dough over itself. Repeat until it becomes smooth and elastic for about 10 minutes.
- Place the dough in a large bowl and cover with plastic wrap, and leave it at a warm place (about 90ºF/32ºC) for 1 hour.
- Make a fist with your hand and push the dough gently and firmly into the center and deflate it.
- Turn the dough onto a work surface. Divide the dough into 3 (about 96g each). Roll each dough into small buns. Place each of them onto a baking sheet with parchment paper. Cover with plastic wrap loosely, let them rise for 30-40 minutes in a warm place.
For the assembly
- Preheat the oven to 320ºF/160ºC.
- Brush on some water on top of the buns.
- Take out the cookies from the refrigerator and start pasting the cookies on the buns.
- Once all the cookies are pasted, put plastic wrap over the buns and gently press them with your hands to make sure all the cookies are stuck well. Then remove the plastic wrap.
- Sprinkle the buns with some granulated sugar. If granulated sugar is not sticking, brush the buns with some water.
- Bake for about 20-25 mins or until the surface gets dry and has a subtle brown color. Once baked, let the buns cool completely.
- When the melon pans are cooled, melt chocolate chips in a microwave. Zap them for 30 seconds and stir. Repeat this process until the chocolate is melted and smooth.
- Place the melted chocolate in a piping bag. Snip off the tips to have an about ¼-inch diameter hole.
- Fill Hello Kitty’s eyes and whiskers with the melted chocolate and enjoy!Tip: If the chocolate hardens back before you could finish decorating, boil some hot water and place it in a heat-resistant cup. Once the cup gets hot, press the piping bag against it and melt the chocolate until it becomes workable again.


